บทความ

งานที่1:สรุปArtificial Intelligence

รูปภาพ
ปัญญาประดิษฐ์  (AI : Artificial Intelligence)  คือ เครื่องจักร(machine) ที่มีฟังก์ชันทีมีความสามารถในการทำความเข้าใจ เรียนรู้องค์ความรู้ต่างๆ อาทิเช่น การรับรู้  การเรียนรู้ การให้เหตุผล และการแก้ปัญหาต่างๆ  เครื่องจักรที่มีความสามารถเหล่านี้ก็ถือว่าเป็น ปัญญาประดิษฐ์  (AI : Artificial Intelligence) นั่นเอง เพราะฉะนั้นจึงสามารถกล่าวได้ว่า AI ถือกำเนิดขึ้นเมื่อเครื่องจักรมีความสามารถที่จะเรียนรู้นั่นเอง  ซึ่ง AI ก็ถูกแบ่งออกเป็นหลายระดับตามความสามารถหรือความฉลาด  โดยจะวัดจากความสามารถในการ ให้เหตุผล การพูด และทัศนคติของ AI ตัวนั้นๆ เมื่อเปรียบเทียบกับมนุษย์อย่างเราๆ AI ถูกจำแนกเป็น 3 ระดับตามความสามารถหรือความฉลาดดังนี้ 1 ) ปัญญาประดิษฐ์เชิงแคบ (Narrow AI ) หรือ ปัญญาประดิษฐ์แบบอ่อน (Weak AI) : คือ  AI ที่มีความสามารถเฉพาะทางได้ดีกว่ามนุษย์(เป็นที่มาของคำว่า Narrow(แคบ) ก็คือ AI ที่เก่งในเรื่องเเคบๆหรือเรื่องเฉพาะทางนั่นเอง)  อาทิ เช่น AI ที่ช่วยในการผ่าตัด(AI-assisted robotic surgery)  ที่อาจจะเชี่ยวชาญเรื่องการผ่าตัดก...

มินิโปรเจค

รูปภาพ
                    เครื่องตั้งเวลาเตือน1-6นาที อ้างอิงhttp://www.elec-za.com/pic อุปกรณ์ 1.PIC16F628A 2.LED 3.BUZZER 4.C 22u 5.ทรานซิสเตอร์2N3904 6.ตัวR 7.สวิต 8.คริสตัล4m CODE int TimeS = 0, i, t, Ar = 0; void OnNumber(int number); void main() { TRISA = 0x00; TRISB = 0x0C; PORTA = 0; PORTB = 0x02; TimeS = 1; while(1){ while(!PORTB.F3){ if (PORTB.F2){ delay_ms(200); while(PORTB.F2) ; TimeS++; if (TimeS > 5) TimeS = 1; OnNumber(TimeS); } } delay_ms(200); while(PORTB.F3) ; for (i=TimeS;i>=1;i--){ for (t=0;t<=59;t++){ OnNumber(i); delay_ms(500); OnNumber(i-1); delay_ms(500); } } PORTB = 0x10; while(!PORTB.F3) ; delay_ms(200); while(PORTB.F3) ; PORTB = 0x02; TimeS = 1; delay_ms(200); } } void OnNumber(int numb...

ตัวอย่างมินิโปรเจค20

รูปภาพ
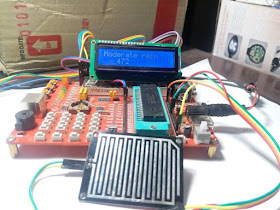
rain detector circuit using pic microcontroller                                    rain detector circuit using pic microcontroller – raindrop sensor code // LCD module connections sbit LCD_RS at RC0_bit; sbit LCD_EN at RC1_bit; sbit LCD_D4 at RC2_bit; sbit LCD_D5 at RC3_bit; sbit LCD_D6 at RC4_bit; sbit LCD_D7 at RC5_bit; sbit LCD_RS_Direction at TRISC0_bit; sbit LCD_EN_Direction at TRISC1_bit; sbit LCD_D4_Direction at TRISC2_bit; sbit LCD_D5_Direction at TRISC3_bit; sbit LCD_D6_Direction at TRISC4_bit; sbit LCD_D7_Direction at TRISD5_bit; ////// rain detection circuit sensor variable/////// float rain_value; char text[10]; void main(void) { ADC_Init(); // it will initialize the adc module of pic16f877a microcontroller Lcd_Init(); // Initialize LCD Lcd_Cmd(_LCD_CLEAR); // Clear display Lcd_Cmd(_LCD_CURSOR_OFF); // Cursor of...

ตัวอย่างมินิโปรเจค19

รูปภาพ
4x4x4 LED cube with PIC16F18877 code #include "mcc_generated_files/mcc.h" // test pattern 1111 //              1001  // 11111001 = 0xF9 // test pattern 1001 //              1111 // 10011111 = 0x 9F uint8_t lvl_0_h = 0xFf; uint8_t lvl_0_l = 0xff; uint8_t lvl_1_h = 0xF9; uint8_t lvl_1_l = 0x9f; uint8_t lvl_2_h = 0xf9; uint8_t lvl_2_l = 0x9f; uint8_t lvl_3_h = 0xFf; uint8_t lvl_3_l = 0xff; uint8_t myledd; uint8_t myledc; int count; void scan_cube(void){     // Select level 0 (top level)     LATB = 0x01;     // Scan columns     // We turn on two LEDs at a time, one from PORTD and one from PORTC        // Update RD7 and RC7         myledd = 0x00;        myledd = myledd | (lvl_0_h & 0x80);        LATD = ...